|
Classic Camera Collectors Club Informatif website of Frank Lakiere |
PHOTOGRAPHIC TECHNIQUES
1. The film• 1.1. How the sensible layer is built
• 1.2. Reflections en halo
2. Some basics of chemistry
3. The development
• 3.1. Developing the film
• 3.2. Stopping the development
• 3.3. Fixing
• 3.4. Washing
4. The registration power of the sensible layer
• 4.1. The sensibility of the film
• 4.2. The registration possibilities of the film
5. Light sensitivity, exposure time an diaphragm
• 5.1. Light and distance
• 5.2. Light and opening of the lens
• 5.3. The diaphragm
• 5.4. The calculation of the series of f-values
• 5.5. The use of the f-values
• 5.6. Filmsensitivity
• 5.7. Exposure time
• 5.8. The right exposure time
6. The technical camera
7. The pinhole camera
Chapter 1 : The film.
1.1. How the lightsensitive layer is built
The image that is formed by the camera is captured on film.
The film consists of a light-sensitive layer - the emulsion - that is attached to a substrate - the carrier.
Both layers have special requirements : they have to be 100% transparant and stable.
So glass is avery good carrier but it has also some disadvantages. Glass is heavy and it is brittle.
That is why modern photographic carriers are made of plastic (plastic, celuloidacetate,...).
The composition of the emulsion and the building of the film layer greatly influence the final properties and quality of the film.
The emulsion layer has 2 important components:
1. The silverhalide (AgX) crystals (X = bromide or iodide or chloride)
2. gelatin
The emulsionlayer is only a few 1/100 of a milimeter thick and each square milimeter contains several millions of microscopical crystals.
On top of this layer a very thin layer of gelatin acts as a protective layer.
This emulsion layer is fixed onto the carrier with an adhesion layer and an anti-halo layer prevents internal reflections.
The layers in a photographic film

- yellow = the protective layer against mechanical damage
- then comes the emulsionlayer (AgX crystals in gelatine)
- between the emulsion and the carrier : adhesion layer and anti-halo layer (red)
- the carrier (= glass, polyester, celluloidacetate,...)
The AgX crystals are ligtsensitive. These are the particles that capture the image.
At first the image on the film is still invisible : this is called a latent image.
The purpose of the photographic development is :
1. to develop the latent image and make a visible image (development)
2. to make the visible image permanrent (fixation)
Photographs (magnification 4000x) of the different layers of a film
Photo 1 : A high-sensitive B/W film
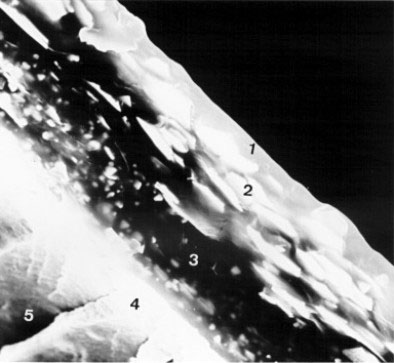
- 1 = surface protection layer with UV filter
- 2 = high-sensitive layer with tubular crystals (T-crystals)
- 3 = layer with smaller globular crystals
- 4 = anti-halo and adhesion layer
- 5 = carrier
Photo 2 : a color film
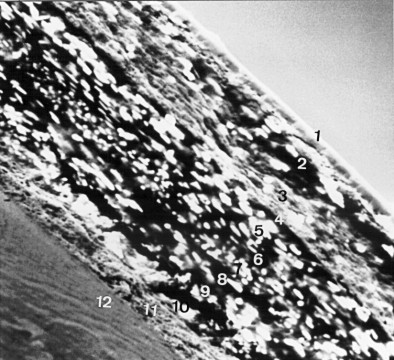
- 1 = surface protection layer with UV-filter
- 2 = bleu sensitive sublayer 1 (big crystals => high sensitivity)
- 3 = bleu sensitive sublayer 2 (small crystals => low sensitivity)
- 4 = intermediate layer with yellow filter
- 5 = green sensitive sublayer 1 (big crystals => high sensitivity)
- 6 = intermediate layer with orange filter
- 7 = green sensitive sublayer 2 (small crystals => low sensitivity)
- 8 = intermediate layer
- 9 = red sensitive sublayer 1 (big crystals => high sensitivity)
- 10 = red sensitive sublayer 2 (small crystals => low sensitivity)
- 11 = anti-halo layer
- 12 = carrier
1.2. Reflections and halo.
The light that falls on the emulsionlayer is captured by the silverhalogenid crystals and forms a latent image.
But if there is a lot of light in one place then some of the light passes through the emulsion and this light could be reflected into the emulsion. That reflected light then gives unwanted black spots in the final negative. This is called reflectionhalo and it is prevente dfrom happening by the anti-halo layer, a colored layer between the emulsion and the carrier. During development and fixation this colored layer is dissolved and disappears.
A second form of halo is the diffusion halo. This occurs when light is reflected on the crystals in the emulsion and then is dispersed. This happens with surexposure.
Diffusion en reflection halo

Chapter 2 : Some basics of chemistry
The chemical elements can be divided in two classes : metals and non-metals.
Some wellknown metals are : sodium, potassium, calcium, magnesium, iron, ...
Wellknown non-metals are the halogenides (chlorine, iodine, bromine), oxygen, nitrogen, carbon,...
An element that reacts with oxygen forms an oxid.
Some oxides are soluble in water.
When a metaloxide dissolves in water it forms a base.
A non-metaloxide + water forms an acid.
For example :
4 Na + O2 -----> 2 Na2O
Na2O + H2O -----> 2 NaOH (sodiumhydroxid = a BASE)
S + O2 -----> SO2
SO2 + H2O -----> H2SO3 (sulfuric acide = an ACID)
When acids and bases react they form salts.
In the photographic development acids, bases and salts are used.
The most important substance in all thes processes is WATER, because water is used as the medium where all the chemical reaction take place. In the last step - the washing - water is also used to remove all the excess reagents from the emulsion.
Remark :
During the development and fixation all the chemical reactions take place in watery solutions. So it is very important that the emulsion layer in which the silverhalide crystal are embedded can easily absorb water. Without water the reactions do not take place. This is the reason why in the collodion process the plates had to be used when still wet. When it dries the collodion forms a plastic layer that does not absorb water.
Chapter 3 : The development
3.1. Developing the film
After the exposure you have an invisible and unstable image in the emulsion. This is the so-called latent image
The energy of the light rays transformed the AgX crystals. Within the crystals some small metallic silver particles were formed.
The developer now attacks those metallic silver germs and transforms the whole AgX crystal into metallic silver.
The latent image now becomes visible.
Scheme of the development
- 1. AgX crystals before exposure
- 2. exposure and formation of metallic Ag germs
- 3. development of the AG germs and reduction of the AgX in the crystal with formation of Ag.
- 4. prolonged development makes the silver grow outside the boundaries of the crystal with the formation of conglomerates. This gives very coarse film grain !!!
Photo's of AG-bromide crystals (magnification 10.000 x)
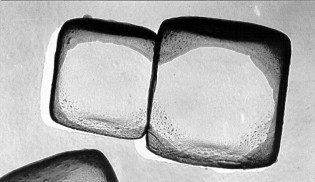
Before exposure.
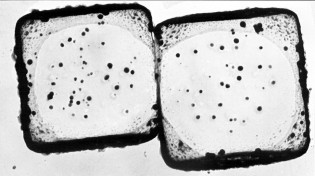
After exposure : after a soft development the silvergerms are easily seen
Photos COPYRIGHT Frank Lakiere, University Antwerp, Belgium
Usually the developer is an organic substance (like hydroquinone).
But a solution of a developing agent in water alone does not work well.
One has to add several other products:
- an activator
- a preservative
- a product to slow down the process
a) A developer works best with a pH>7 and thus a base is added (for instance : Na2CO3, NaOH).
The higher the pH, the faster the developer reacts. Because the base is needed to have sufficient reactionspeed this product is called the activator.
b) A developer that stands open to the air oxidizes and the color turns brown. The oxidation is stopped by putting the developer in an air-tight container and by adding an anti-oxidant, usually sodiumsulphite. This is the preservative.
c) The developer reacts not only with the metallic silver germs but after these crystals are developed it also reacts with neighbouring non-exposed crystals. When this occurs the image becomes misty and that is why this is called 'fogging'
To prevent this a restrainer (usually KBr) is added to the developping solution.
3.2. The stopbath
The longer a photographic emulsion stays in the developing bath, the darker the negative will be and the more chance there is on fogging.
When the image on the film is developed to perfection the developing process is stopped by using an acid stopbath.
An acid solution is used because we saw that the developer needs to have a high pH to work well.
So by putting the emulsion in an acid solution to bring the pH <7.
Usually a solution of acetic acid or of citric acid is used as stopbath.
3.3. The fixation
After the development the image is visible but not yet stable.
The exposed AgX crystals are transformed to metallic Ag and the development was stopped at the right time, but the emusion still contains all the non-exposed crystals. These are still light sensitive and if they stay in the emulsion the image will turn darker and darker until eventually the image will be lost.
The fixation now removes the non-exposed AgX crystals from the emulsion and doing so it makes the photographic image permanent.
The most important substance in the fixer is sodiumthiosulphate.
In the old days it was also called sodiumhyposulphate and that is why some still call the fixing bath 'hypo'.
To have a perfect process of fixation some additives are added:
a) The stopbath did stop the development but some developer may have remained in the emulsion. This developer is neutralised by adding acid to the fixer. b) The fixing substance (sodiumthiosulphate) does easily form colloidal sulphur. Sodiumsulphite is added to the fixer. The sodiumsulphite is not added as an anti-oxidant but it reacts with the sulphur and forms thiosulphate.
c) In the process the gelatin in the emulsion swells as it absorbs water and it also becomes softer. To avoid excessive swelling during the washing process of the gelatin a hardener is added to the fixer. d) This hardener protects the emulsionlayer but it only works with a ph of ± 4.
To keep the pH of the fixing bath constant a buffer is added. This usually is borax;
3.4. The washing
The last thing to do is to wash with pure water so that all the remains of the chemicals are removed from the emulsion.
These remains of chemicals do give discolorations and stains later on.
So the washing has to be done thoroughly to have a permantly stable photographic image.
Chapter 4 : The registration power of the lightsensitive layer
4.1. The sensitivity of the film
The sensitivity depends largely on the size of the silverhalide crystals.
A bigger crystals has more chance to be hit by a light ray than a small crystal.
This means that a more sensitive film has a bigger grain.
A big grain in the emulsion can also be the effect of diffusionhalo that occurs when over-exposing the emulsion.
A smaller grain can be obtained by using a less sensitive film, by the choice of the developer and by using a more diluted developer.
The degree of movement durng the delopment also plays a part in it (more movement = bigger grain).
It is interesting to see the evolution of the sensitivity of film in time.
From the beginning until now there has been a search for higher filmsensitivity (or faster emulsions).
This is a short overview of this evolution:
1827 : Niepces process with bitumen: exposure time = 6-8 hours
1839 : Daguerreotypy with silverjodide : 30 minutes
1841 : Talbotypy with gallic acid developer : 3 minutes
1851 : Wet collodion process : 10 seconds
1864 : Collodion silverbromide emulsion : 15 seconds
1878 : Gelatin silverbromide emulsion : 1 tot 1/200 sec
1900 : Gelatin silverbromide becomes better and better : until 1/1000 sec
The evolution also involves the spectral sensitivity.
The plates for Daguerreotypy were sensitive only for UV, bleu and a restricted part of the visual spectrum.
The use of 'sensitizers' made that gelatin emulsion became sensitive to a broader spectrum.
The orthochromatic film was still more or less insensitive to red light, but the panchromatic film is sensitive to the total visual spectrum and to the near UV.
By using quartz-lenses it is even possible to extend the sensitivity to the far UV area and with the right sensitizers one can also have film that is sensitive to infrared light.
4.2. The registration possibilities of the film.
The silverhalogenide cristals are sensible to only some specific colours. Because the cristals have a yellowish colour they can absorb easily blue, violet and UV light but they reflect other colours.
It is practically impossible for yellow, green and red light to penetrate into the cristal and so give the energy that creates a silver germ.
In that way it is quite impossible to have a good image of the reality and that is why one adds products to the emulsion to absorb the coloured light and give the energy to the silverhalogenide cristals. The emulsion is made sensitive to green light using a suitable red pigment and sensitivity ot green light can be achieved by adding a red pigment.
Older films were more sensitive to yellow and green light and much less to red light. These films are called ortho-chromatic. Such a film can be handled in a dark-room with a dark red light on and these films are still in use for specialised technical photography, for example in electron microscopy.
The normal modern films are sensitive to all colours and are caled panchromatic films.
The human eye can see a much larger area of contrasts than any film. The span where a film gives a little bit of detail in deep black and a little bit of detail in bright white is at least 100 times smaller that what our eyes can see.
Theoretically the film can registrate 7 diafragm stops. But in pratice that is rather like 5 stops. So with an 3 stops overexposure and 2 stops underexposure we still can see some detail in the darkest and lightest areas. By using holding back or pushing it is possible to have a print where these details are clearly visible. Outside these exposure borders there is only pure black or pure white.
For example : with a lightmeter we determine that the right exposure for mid-grey is 1/125 sec by f/8.
You can see the scale of the diaphragm values and the result
- for the film
- for the print
- and what to do if the result is not good
1.4 ..... 2 ..... 2.8 ..... 4 ..... 5.6 ..... ***8*** ..... 11 ..... 16 ..... 22 ..... 32 ..... 45
--------------------------------------------- GOOD ------------------------------------------------
OVEREXPOSURE ....................................................................... UNDEREXPOSURE
Negative is too dark .............................................................. Negative is too light
Photo is too light ....................................................................... Photo is too dark
during printing : push .................................................. during printing : hold back
Chapter 5 : Sensitivity, diaphragm and exposure time
5.1. Light and distance
The amount of light that per surface unit reaches an object diminishes very rapidly as the distance becomes greater.
Let's look at a lightsource that shines through a small hole and unto a screen there delivers a quantity of light L.
With the screen at a distance of 1 meter the light formes a circle with radius r (diameter = 2r)
and surface of the lighted area is πr2.
With the screen at a distance of 2 meters the radius of the lighted area will be 2 times as long and so
the surface of the lighted area is Π(2r)2 = 4Πr2
With the screen at a distance of 3 meters the radius of the lighted area will be 3 times as long and so
the surface of the lighted area is Π(3r)2 = 9Πr2
So we see that when light shines on an area at a certain distance that light is spread on a surgface that is equivalent with the sqaure of the distance.
The quantity of light per surface unity wil diminish with the square of the distance.
5.2. Light and diaphragm
When light passes through a small round hole then the quantity of light that passes that hole is equivalent with the surface of the hole.
With a round hole that surface = Π x r2.
So the quantity of light that passes is equivalent with the square of the radius of the hole.
Remark : because the diameter is 2x the radius you can also say that the quantity of light that passes is equivalent with the square of the diameter of the hole.
5.3. The diaphragm
The aperture of the lens is called diaphragm and is given by an f-value.
The f-value is the value given by the division of the diameter of the aperture ofthe lens (d) divided by the focal length (F) of the lens.
For example : a lens has a focal length of 50 mm ;
with an aperture diameter of 25 mm the f-value = 25/50 =1/2
with an aperture diameter of 12.5 mm the f-value = 12.5/50 =1/4
with an aperture diameter of 6.25 mm the f-value = 6.25/50 =1/8
The notation of the f-value as 1/2, 1/4, etc... is simplified by just using the denominator.
So the diaphragm notition is f/2 , f/4 and f/8 (or also F:2, F:4;, F:8,...)
So a higher f-value corresponds with a smaller aperture !!
5.4. Calculation of the f-value series
We ave already seen that when a light bundle L that passes a lens then the quantity of light will be equivalent with the square of the diameter of the aperture.
So we have L = k.d2 (k = a proportionality factor).
Let's take a lens with focal length F = 100mm
When the aperture diameter = 100mm we have
with aperture fully open : d = 100 mm and so L = k.100.100 = k.10000
And thus f = d/F = 100/100 and this diaphragm is f/1
When we halve the quantity of light by halving the diameter of the aperture we have L= (k.10000):2 = k.5000
This corresponds with an aperture diameter of d = square root of 5000 or d =70,71 mm
and the f-value = d/F = 70,71/100 = 1/1,41
So we have a diaphragm of f/1,4
Anaother halving gives d = square root of 2500, so d = 50 mm
and the f-value is = 50/100 = 1/2
So the diaphragm aperture is f/2
Going on like this we have d = square root of 1250, so d =35,35 mm
f-value = 35,35/100 = 1/2,82 and thus aperture is f/2,8
And so on : d = square root of 625 = 25 mm
f = 25/100 = 1/4 and aperture is f/4
d = square root of 312 = 17,68 mm
f = 17,68/100 = 1/5,65 and so aperture is f/5,6
d = square root of 156 = 12,5 mm
f = 12,5/100 = 1/8 which gives an aperture f/8
d = square root of 78 = 8,839 mm
f = 8,839/100 = 1/11,3 and thus aperture f/11
d = square root of 39 = 6,245 mm
f = 6,245/100 = 1/16,0 and aperture f/16
etc... and that then gives f/22 - f/32 - f/45 - f/64 - f/90 - f/128 - f/180 - ...
Each f-value = the preceeding f-value X the square root of 2 (=1,414)
This gives a series of f-values whereby the quantity of light is halved with each next value :
1 : 1,4 : 2 : 2,8 : 4 : 5,6 : 8 : 11 : 16 : 22 : 32 : 45 : 64 : 90 : 128 : 180 : 256 enz.
REMARKS:
The series that we calculated is the modern F-series that is used on almost all modern cameras for amateurs.
The professional cameras most of the time use another series with 1/3 stop intervals. This series is as follows :
1 - 1.12 - 1.26 - 1.4 - 1.6 - 1.8 - 2 - 2.2 - 2.5 - 2.8 - 3.2 - 3.6 - 4 - 4.5 - 5 - 5.6 - 6.3 - 7.1 - 8 - 9 - 10 - 11 - 12.7 - 14 - 16 - 18 - 20 - 22 - ...
In this 1/3rd stop series every f-value = the preceeding f-value x 1.125 (this the sixth root of 2)
Older lenses sometimes have another series of f-values with f/4.5 and f/6.3 and the series of this values is
4.5 - 6.3 - 9 - 12.7 - 18 - 25 - 36 - 50 - ...
In pinhole cameras where the aperture is very very small we can have very large f-values. When such a camera has a pinhole with a diameter of 0.2mm and the distance of the film to the pinhole is 7 cm (70 mm) then we have an f-value of 0.2/70 = 1/350 and thus f/350.
5.5. The use of the f-values
An advantage of the use of the f-value is that when using different objectives the same f-value gives the same amount of light through the lens.
For example : a 50 mm lens with f/8 has a lensaperture with a diameter d
and a 100 mm lens with f/8 has a lensaperture with diameter D
The f-value = diameter/focusing distance and thus
for the 50 vmm lens with f/8 one has 1/8 = d/50 and so d= 50/8 = 6,25 mm
for the 100 mm lens with f/8 one has 1/8 = D/100 and so D = 100/8 = 12,5 mm
The amount of light is proportional with the square of the diameter of the aperture and opposite proportional with the square of the distance.
So for the 50mm lens one has L = k. (6.25)2/(50)2 = k.(1/8)2
and for the 100 mm lens this is L = k.(12.5)2/ (100)2 = k.(1/8)2
This proves that the amount of light through the lens at a given f-value is independent of the focus length of the lens.
5.6. Sensitivity of the film
Not all lightsensitive emulsions are equillay sensitive.
One has films with low sensitivity. These films need more light than films with higher sensitivity.
To have the possibility to compare filmsensitivity there have been lots of sensitivity scales (comparable to the temperature scales in ° Celsius, ° Fahrenheit, but also ° Kelvin and even in the nineteenth century ° Réaumur).
For filmsensitivity there were scales like the Kodak Speeds, Weston, Scheiner, Ilford, ...
Ilford was the only scale to use letters : Ilford "A" equalled 4 ASA, "C" = 16 ASA, "E" = 64 ASA, "G" = 256 ASA en "H" = 512 ASA.
The english SCHEINER scale was exponential (like the DIN scale)
Until 1977 in the Sovjet Union the GOST scale was used. This scale is almost identical to the ASA scale.
The ASA systeem dates from 1958 and it is based on the work in the 1930's of L.A. JOnes from the Kodak Research Laboratories. His idea was to find a value for the minimal exposure that could still lead to a good print.
The method of Jones needs a lot of testing and it was used from 1940 on by Kodak under the name 'Kodak Speeds'.
The American Standard Association (ASA) makes this with some modifications the standard method.
In 1958 the ASA standard is modified again and the method is now based - like the DIN method - on finding the minimal density for medium contrast.
Together with some other modifications this makes that Kodak Speed value of 100 in 1940 is equivalent with ASA 25 in 1958.
ISO 6:1993 method of determining speed for black-and-white film.
There typically are five regions in the curve: the base + fog, the toe, the linear region, the shoulder, and the overexposed region.
For black and white negative film, the 'speed point' m is the point on the curve where density exceeds the base + fog density by 0.1 when the negative is developed so that a point n where the log of exposure is 1.3 units greater than the exposure at point m has a density 0.8 greater than the density at point m.
The exposure Hm, in lux-s, is that for point m when the specified contrast condition is satisfied. The ISO arithmetic speed then is S = 0,8/Hm
Determining speed for color negative film is similar in concept but more complex because it involves separate curves for blue, green, and red. The film is processed according to the film manufacturers' recommendations rather than to a specified contrast.
Two systems have dominated for a long time : DIN (Deutsche Industrie Norm) en ASA (American Standards Association).
The DIN schaal is exponential and gives a doubling of the sensitivity for every 3 units. Thus a film of 21 DIN is twice as sensitive as a film of 18 DIN and half as sensitive as a film of 24 DIN.
With the ASA scale the sensitivity is proportional with the number : so a film af 200 ASA is half as sensitive as a film of 400 ASA.
To make an end to these different standards the International Standards Organisation has proposed to use a combination of ASA and DIN. This is called the ISO-standard.
The ISO-value has 2 numbers : the first number is the ASA-value, followed by the DIN-value. For example : ISO 400/27°.
This is a list of the most common ISO-values:
ASA = 25 ; DIN = 15 ; ISO = 25/15°; bijv. Technical Pan, Agfa Ortho
ASA = 50 ; DIN = 18 ; ISO = 50/18°
ASA = 100 ; DIN = 21 ; ISO = 100/21° ; bijv. T-Max 100, Agfapan 100
ASA = 200 ; DIN = 24 ; ISO = 200/24° ; bijv. Kodak Gold 200
ASA = 400 ; DIN = 27 ; ISO = 400/27° ; bijv. T-Max 400
ASA = 800 ; DIN = 30 ; ISO = 800/30°
ASA = 1600 ;DIN = 33 ; ISO = 1600/33°
But you also have intermediate values:
ASA = 64 ; DIN = 19 :ISO = 64/19° ; bijv. Ektachrome 64
ASA = 125 ; DIN = 22 ; ISO = 125/22°; bijv. Ilford FP4, Kodak Plus-X
ASA = 320 ; DIN = 26 ; ISO = 320/26° ; bijv. Tri-X Prof
ASA = 1000 ; DIN = 31 ; ISO = 1000/31° ; bijv. Ektar 1000
Remark : the sensititvity of photographic paper is around 6 ASA. So this is ISO 6/6°
5.7. Exposure times
The exposure time is given in seconds or fractions of seconds (f.e. 1/30 sec; 1/1000 sec) and this gives the total time that the film receives light through the lens. The exposure time is regulated by the shutter of the camera.
The amount of light that reaches the surface of the film is proportional witht he exposure time.
When the exposure time is halved then the amount of light that reaches the film is also halved.
On modern cameras we have the following series of exposure times(in seconds)
1 : ˝ : Ľ : 1/8 : 1/15 :1/30 : 1/60 : 1/125 : 1/250 : 1/500 : 1/1000 : 1/2000
As with the aperture value we normally only use the denominator andd so the series of exposure times is:
1 : 2 : 4 : 8 : 15 : 30 : 60 : 125 : 250 : 500 : 1000 : 2000
5.8. The exact exposure
To have an exact exposure one needs to have a perfect balance betweent the amount of light that reaches the film and the films' sensitivity.
We have to take 3 parameters into account to achive this: aperture, shutter speeds and sensitivity of the film.
For example: each of the following settings gives the same exposure result.
setting A: film 50 ISO; f/11; 1/60 sec
setting B: film 50 ISO; f/16; 1/30 sec
setting C: film 100 ISO; f/16; 1/60 sec
setting D: film 400 ISO; f/11; 1/500 sec
So you always have to choose for a more sensitive or a less sensitive film, a larger or smaller aperture and a longer or shorter exposure time. Most of the time the final choice will be a compromise.
If you want short exposure times then you can use a larger aperture, but that gives an image with less depth of field. You can also choose a faster film, but films with higher sensitivity have a bigger grain.
If you want more depth of field and fine grain then you choose a small aperture and low-sensitive film. But then the expsoure time will be longer. With times longer than 1/60 sec the chance is that the image will be blurred by movement of the camera. In this case you need to use a tripod.
With times over 2 sec it is also necessary to take the Schwarzschild effect into account.
But how can you proceed to have the correct exposure?
Most modern cameras have an in-built exposure meter. The moden filmcassettes also have a DX code and with this system the camera knows the filmsensitivity. With the aperture priority system you only have to set the aperture and the camera calculates the exposure time. With an exposure priority system you set the exposure time and the camera chooses the right aperture.
In most cameras there also is an AUTO mode and then the camera chooses exposure time and aperture and if it has autofocus then it also focuses automatically.
With an automatic camera the photographer only needs to compose the picture and click on the exposure knob to have a well exposed image.
But when the photographer has special demands, like a very shallow dept of field or if he wants some over- or underexopure, then he has to use the manual settings of the camera.
When using cameras without exposure meter it is possible to have a good exposure by using the 'sunny 16 rule'. This means that the correct exposure in sunny weather is 1/100 sec for a ISO 100/21° film and with an aperture f/16.
REMARKS :
1.
With a 35mm camera the diaphragm settings are almost always with 1/2 stop.
With a technical camera the aperture is set with 1/3 stop.
So it is not by accident that the DIN series is such that 1° equals 1/3 diaphragm stop.
2.
With an electronic camera the electronics make it possible to divide the scale of diaphragm stops in partitions that are smaller than the partitions in a mechanical camera.
3.
With a flasmeter the lightmetering is even given in one-tenth of a stop.
This is very useful because in that way it is possible to measure an even lighting over a large surface.,br>
Especially when using positive film it is important to have accurate exposure because it is not possible to correct once the film has been developped.
4.
When the term "one stop more" or 'one stop less" is used this is from the standpoint of the film.
So "one stop more" meams giving more light or larger aperture (= smaller f-value).
Chapter 6 : The technical camera
Hereafter you find a description of the technical camera of the monorail type. Theoretically tis is a very simple design. The camera consists of a lensboard with lens at the front, a viewing glass/filmholder at the back, a collapsable bellows in between and a monorail where the parts are mounted on.
This is a scheme of the TOYO-VIEW CX45 monorail technical camera.

1 = the back with viewing glass and the filmholders. The back has settings for up, down, left, right and swivel.
2 = the frontplate with lens and shutter. The frontplate can also be set in all directions.
3 = the knobs to control the settings of the frontplate and back.
4 = the monorail
5 = the collapsable bellows
6 = a system to fix the camera to a tripod
7 = knobs used for focusing
8 = built-in spirit level
9 = exchangeable lensboard
there are also technical cameras that are fully mounted and these can be folded and unfolded. So it is much easier to mount these cameras. One of the nicest examples of such a camera is made by WISNER (USA)

The Wisner Technical Field camera
This camera is made in several sizes : 4x5", 5x7" and even 8x10" negatives .
This is approx. 10x13, 13x18 and 20x25 cm.
You can find more on the large format cameras at http://www.camerareview.com
I am still translating the rest of these pages from Dutch to English!!
You can click [Nederlandstalige versie] on top of the page to see the dutch version....